So I thought I would keep it simple. The most basic thing you will need for just about any project is a tape measure. We have all seen one but have you actually learned to use one? Well maybe I can help. Here are some tips and tricks to get you going.
Tip #1 Let’s Start at the Tip
The tip of the tape measure is not just for looks. It was designed specifically to help use this nifty little life saver. The end has a type of hook used to (you guessed it) hook onto something to keep your ruler steady while reading it. You may notice the tip has a bit of movement to it when you pull or push against something. This is normal. In fact, if this part doesn’t move just throw out your tape measure because its not going to give you a true measurement. This cool little design is for accurate measurement when you pull or push against something it gives just enough to makes sure you get the right measurement anyway you use it. And that little hole on the tip fits a nail head perfectly just for added convenience.


Tip #2 Reading the Lines
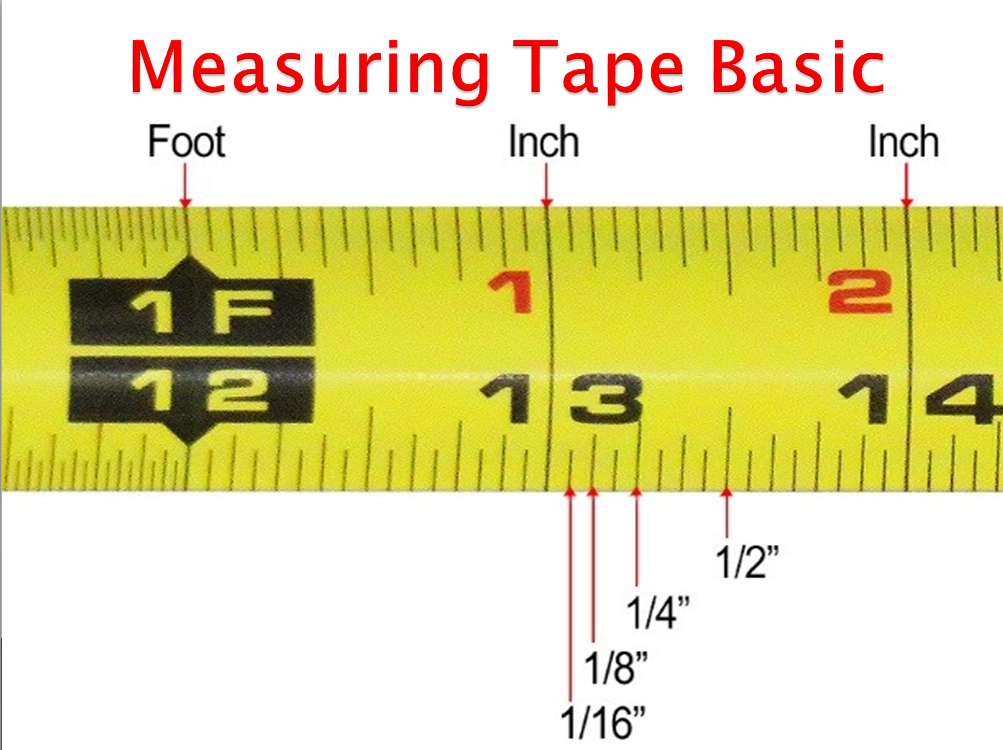
Now down to the nitty gritty, actually measuring something. All those lines seem pretty intimidating but maybe not so much after I explain. So your inch line goes for the width of the tape. Easy peasy no confusion there. Look a little closer, the half inch line goes half the width. See the pattern yet? The smaller the line the smaller the measurement. There are 16 lines between every inch marker. Check out this link for a better idea on how to break down the lines.

Tip#3 Numbers
Lets talk numbers. You may notice some numbers on your tape measure are black, some red, some with bold back frames around them and some with bold red frames around them. Well, here’s why. The black numbers are your inch markers. After every 12 inches you will see a bold black arrow indicating a foot marker. After every foot you will see red numbers on top that start over at 1 inch. This is so you can quickly read a measurement. You can say something is 1 foot 2 inches long, instead of 14 inches long. You will also find a bold red marker with a number every 16 inches. This is for framing. The US guideline is while framing a wall you have to put a stud up every 16 inches. So I can just roll out my 25 foot tape measure and mark out every 16 inches, because my tape measure has them in bold red markings already set up for me. Pretty handy right! Framing is also made simple by the small black diamond shape marked every 19.2 inches on your tape measure. This is for the standard US guidelines on floor joists and roof rafters.


3 Quick Tricks!
- Now for some quick tricks we can all use to get our projects done a little quicker. How about we start with finding the center of a piece of wood. Not to hard if your board is a perfect even number that can be divided equally. Not the case on most pieces. So what now? If your board length is 4 11/16 like in the photo below.

You can angle your tape measure until you get to an even number and finding the center becomes easy. Look at this.

If wanted cut my wood block into three equal parts I can look at the picture above and mark in the 2 inch mark and the 4 inch mark and I would have three equal parts.
2. Another neat trick is using your tape measure base to measure the length of maybe a doorway. You could always bend the tape measure and try to keep it still or you can use the base of your tape measure. The length of the base is always on your tape measure. For me its 3 inches. So I extend my tape measure and place it along the floor I know whatever the ruler says plus 3 inches is my measurement.

3. So this is a trick I use a lot. I’m big on my scroll saw. It is my favorite tool so this is a simple but great trick for me. If I am making marks on more then one board so I can make my cuts I use a dry erase marker to mark off right on my tape measure. That way every time I go to a new board the hard part is already done for me. And, it wipes right off. Always nice when something is marked and ready to go.

Thanks everyone who took the time to read about how i’m makingitmyway. I hope you enjoyed my info. I’m going to leave you with one more quick tip, because, well I’m a mom so…. Please be careful these bad boys snap back fast and they are sharp and if you think a paper cut hurts, you are in for a rude awakening. Lots of Love Bye!